A beginner’s guide to grilling sounds like the best thing ever, when you’re just starting out. You’re going to need tips on how to light a grill, how to pick the right one for you, how to know the internal temperature of your food, and so on.
Sit down with me then, and let me take you through the basics of grilling.
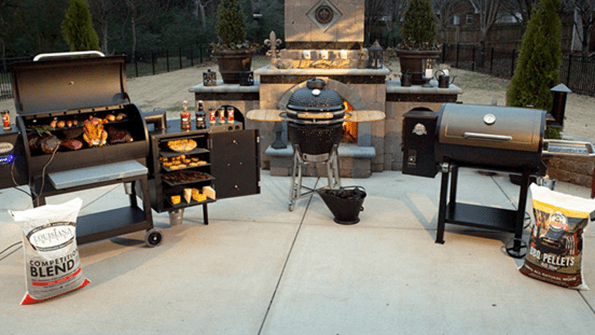
Choosing the best grill for your needs
The first step is actually choosing what kind of grill you might want to use. It may sound like an irrelevant bit of information, but each grill and grill style has its pros and cons.
Meaning you’ll have to take a look at each before deciding what kind of grill you’d like to have at home.
You should take a look at your backyard, see if you can fit a large grill somewhere. Or maybe on the patio. How much space do you have ?
Do you have lots of spare time to wait for the grill to heat up and build a nice heat, like charcoal grills ? Or is your schedule usually tight and you’d need a quick grill that can get ready in 5 minutes ?
Would you like to grill for large groups ? Do you have a big family ? Is this just a one-man operation ?
And are you going to grill a whole lot, almost every other day ?
All these bits of info matter, since it means you can better pinpoint exactly what kind of grill is best for you. So let’s take a look at each of the main types.
Charcoal grill
Charcoal grills are pretty much the kings of grills. They’re old school, and they deliver that nice, smoky flavor that we all love so much with our grilled meats and veggies.
It has its own pros and cons, and you should check them out before deciding on a charcoal grill.
If you do decide to get a charcoal grill, you can check my Best Kettle Grill page, and you’ll see a beautiful Weber charcoal grill, with a large enough grilling surface that you can easily serve a family of 4, possibly 5.
Pros of charcoal grills
A charcoal grill provides a good smoky flavor. Not as much as a pellet or wood grill, but it’s much more than a gas or electric grill will be able to get you. And if you’re really committed to grilling, this might be an important issue.
Another great thing about charcoal grills is that they can get hot, very very hot. Hotter than gas grills, and this means you can cook your steaks way better than with anything else.
The heat is constant, unless you get a flare up when a bit of grease drips onto the coals. It also allows you to build indirect heat, by making a two one fire. This will allow you to cook pretty much any kind food item, since some require direct heat, and some require indirect heat.
Yet another advantage of charcoal grills: they’re portable, and you can easily take them with you when tailgating or just on a random camping trip.
Cons of charcoal grills
One of the cons of using a charcoal grill is the long wait time, until it heats up. It does get to very high temperatures, but it’s going to take about 20 minutes (maybe a bit more) to get you to the temperature you want. Depending on your patience, this may prove too much of a wait in the long run.
Another con is that charcoal grills are notorious for ash, ash blowing in the wind, and ash possibly getting on your food if the wind want to mess with you. It also makes cleaning more difficult, since you need to (again) mind the ash and just how easy it is to get it everywhere.
Charcoal grills are harder to control, compared to electric or gas grills. You can’t turn them on or off, and this means that you’re going to again have to wait around for them to cool down, and have a fire extinguisher on hand, in case of emergency.
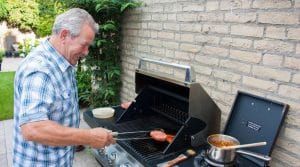
Propane/gas grill
A gas grill is your best friend if you want to get food done, like, yesterday. It’s one of the most common grill types, right up there with the charcoal grill. It does have its pros and cons, and you’re going to need to take them into account.
If you do decide to use a propane grill, feel free to check my Best Gas Grill page. There you’ll see the grill I’ve used for several seasons, before being gifted another grill by a family member. It’s a reliable and sturdy gas grill.
Pros of propane grills
A propane grill gets hot really quick, in a matter of 3-5 minutes. And it usually got a temperature gauge to let you know the status of your grill.
In case it’s a very old model and has no temperature reading, it at least got some notches going to from large to small, to let you know the size of the flame (and thus the heat).
Another pro of using a gas grill is that lighting it is a breeze. All you’ve got to do is push a button, and it’s up and running. Unlike wood or charcoal grills, which need a good few minutes to get their bearings and light up.
And finally, getting fuel for a gas grill is easy. Propane tanks are not hard to come by, and they’re easy enough to handle, as long as you’re careful with them.
Cons of using a propane grill
One of the biggest downsides of using a gas grill is the lack of smoky flavor. As an aspiring grill master, this is something you need to be aware of since you’re going to either accept the fact, or somehow smoke the meats and veggies. This is harder to do on a gas grill.
Another aspect of the lack of smoky flavor is the fact that your food is cooked on gas flames, and at times may pick up a gas flavor.
Another con of using a gas grill is that it’s going to break down much faster than other grill types. This is because it’s also got some wiring, buttons, and simply parts that can and do break down in time. A simple grate won’t break down, but the burners will, after a while.
It’s not as simple and straightforward as other grills, being made up of several parts. This also means that it’s also harder to move around, because it’s usually larger and heavier than other grills. So taking it camping won’t be a thing, unless you get a portable version with a much smaller grill space.
Pellet/wood grill
A wood or pellet grill is probably the closest you can get to the old-timey smell and taste of a grilled meal, cowboy style. Back when grilling was less common and campfires were the norm, and the food took on a delicious, smoky flavor.
It was its own drawbacks and plus sides, so here they are.
Pros of using a wood grill
One of the most important pros of using a wood or pellet grill is the fact that you’re getting the most amount of smoke flavor possible. You’re cooking over smoldering wood, smoking the food as you cook it. You can’t get more smoke than that.
And you can always change up the flavor by adding smoking chips from this or that wood to your pellets or wood bits.
Another pro is that a wood grill is going to reach higher temperatures than a gas grill, though a bit less than a charcoal grill. So again, if you need or want to cook things on high heat, then a wood grill is for you.
Yet another pro, a wood grills can let you build a two zone fire, or however many zones you can realistically fit. Maybe you can find an unusually large grill.
Cons of using a wood grill
One thing you should know about using wood grills is that, like charcoal, it’s harder to control and it’s not going to be easy to turn off. You have to wait for it to die down, and be careful to make sure you don’t get too many flare ups.
Another possible con of using wood grills is that if you’re using pellets, you’re going to need to learn how and where to store them, since you can’t leave them in the grill’s hopper. Otherwise they may build up mold, especially if you live in a high-moisture area or it’s a rainy season.
And another con, a wood or pellet grill does provide a lot of smoke, but it’s harder to actually see what you’re doing if you have no ventilation, so keep that in mind.
How to light any type of grill
Lighting your grill is the second step after getting your hands on an actual grill. No matter what kind you’ve got to turn it on somehow, right ?
Well, if you went for a gas grill, you’re in luck. All you’ve got to do to turn it on is to just press a button, and check that the propane tanks are alright. Gas grills light up as easy as a stove, so it’s kind if a no-brainer.
If you’re using a charcoal or wood grill, you will need a lighter. Now, you can use a simple piece of paper rolled up into a 2 inch thick wad, set that on fire, and nestle it between the coals or pellets.
You can also use actual firestarters or some lighter fluid, which I’ll get into in a minute. The point is that lighting up anything except a gas grill is going to take some time, and it might be frustrating if it is your first try.
Should you use lighter fluid or not ?
This one is up to you, but if you ask me lighter fluid isn’t really worth it. I mean, yes you get an instant flame and you can start heating the wood or coal right away, no worries about that.
But your food will have a bit of a kerosene tinge to its flavor, especially if you can’t help but pour a little more fluid over the coals or wood when it seems like they’re dying down.
This is something my father used to do, and I could always tell when he did it, even if hadn’t seen it happening. I could taste it on the food, but then again maybe I’ve got very sensitive taste buds.
I say skip the lighter fluid, but if you’re in a hurry to get the food done, it’s definitely going to help. For flavor? Not so much.
Should you use fire starters ?
Fire starters, if you’re not familiar with the items, they are squares made of pressed wood and paraffin wax.
They light up instantly, and can burn up to 10 minutes, and you can use them to light your coals or wood/pellets.
Now, the difference between these and lighter fluid is that well, these squares contain no kerosene, hence the lack of lighter fluid smell or taste on your food.
They do take longer to start your grill, yes, but they’re better for flavor. A great set of 100 pieces can be found on my Best Fire Starters page, and it’s going to help you start your grill in no time.
The grill tools you’ll need
When grilling you’re going to need a whole set of tools which you may or may not already have in your kitchen. I’m guessing you won’t since long stainless steel tongs aren’t mandatory for handling the stove or oven, but they are for a grill.
For example a set by Romanticist (recommended on my Best Grill Tools page) that I absolutely love is a 20 piece, stainless steel set. It’s got chef’s spatula, grill tongs, silicone basting brush, 8 pairs of corn holders, 4 metal kabob skewers, cleaning brush, and extra brush head, among other things.
Once you have a great set of grilling tools, the job will become much easier.
Dealing with bad weather and darkness
Alright, you’ve got your tools all set. You’ve got your grill, and you know how to turn it on. What if it’s raining ?
It may sound silly, but you’re never really aware of something until it gets in the way. So what if you’ve planned a big BBQ and but it’s raining outside ?
A way to cover up your grilling area will help here. The most rudimentary setup to have one of those large umbrellas you might find for a patio, but those will get grimy and smoky in time, and might just catch on fire.
You need something dedicated, that’s going to keep you, the grill, and the area immediately around you dry, and covered. That sounds like a grill canopy. You can find a great one on my Best Grill Canopy page.
Another item, if it’s both raining and dark, is a grill light. One of the best things to do is to get a grill light that’s going to stay put, and have a high temperature resistance, like the one I recommend on my Best Grill Light page. It can be attached to the side of the grill, and stay there as long as you need it.
How to know when your grill is hot enough
Knowing when your grill is hot is going to help you know when it’s time to place the food on the grill. So accurately gauging when the time is right is going to help you a lot.
After all, placing meat on a grill that’s too hot is going to get you food that’s going to stick to the grates, and be very hard to flip when the time comes.
So if you’re using a gas grill, you’re going to use its temperature gauge, or display. That’s immensely useful since it really saves you a lot of trouble.
What if you have no such thing ? Then you’re going to need to do one of two things:
1. Get a thermometer for your grill. You can even use one that’s meant to be inserted into food, since it will register the ambient heat in the air. If you place it on the grates themselves be aware that they’ll register higher than the air temperature, so they might fool you. A great, wireless thermometer is on my Best Grill Thermometer page.
2. If you don’t have a thermometer, or don’t want to get one, you can use a simpler method, though not nearly as accurate. All you need is your bare hands.
Light the grill, and let it warm up. After a few minutes, when you think it might be ready, extend you hand over the grill, palm down. Do not touch the grill, but keep it an inch or two above the hot grates.
The amount of time (seconds) you can keep your hand over the grill is how hot the grill is. The times are:
- 5 seconds, low heat
- 4 seconds, medium heat
- 3 seconds, medium high
- 2 seconds, high heat
- 1 seconds, very high heat (as hot as it can get)
This is a very rudimentary way or checking temperatures, and there is no clear translation into degrees.
Should you close the lid on the grill ?
Of course, when heating up the grill you definitely need to close the grill. The hot air on the top part of the grill (under the lid) is going to help the grates get evenly hot, and ready for use.
If you’re going to grill with the lid on anyway, then you definitely need to heat the grill with the lid closed.
But how do you know which foods need to keep the lid closed or not ? Well, a good rule of thumb is that foods thicker than 3/4 inches need (like big steaks or babyback ribs, or corn on the cob) will need the lid down.
And thin foods, like most veggies or for example chicken breast, will need the lid open. Why ?
A closed lid is going to get your food cooked both on the outside and the inside. When the food is thick, you need it to be cooked on the inside as well.
This means it needs heat from all direction, not just from the underside. This helps the food both caramelize on the outside, and get cooked on the inside.
It also helps keep food juicier since water won’t escape as quickly through evaporation.
An open lid means the food will sear quicker, and it will get that perfect balance between nice, crispy outside and tender, juicy inside. As long as the food is on the thin side, that is.
Keep in mind that if you’re planning on smoking the food while you grill it, a closed lid will trap more smoke, and your food will be more flavorful
Should you leave the vents open ?
It really depends on what you’re trying to do. Most grills have upper and lower vents, and they perform different jobs.
For example if you’re using a charcoal or wood grill, opening the lower vents will allow more airflow into the burning area. This means more oxygen, and this feeds the flames and heat. So if you want more heat, open the lower vents.
If you want lower heat, close the lower ones, and open the upper vents. This allows heat to escape more easily, since hot air will always be present in the highest part of the grill.
Also, closing the lower vents while you open the upper ones means there is no extra oxygen to feed the heat, so it won’t go up.
If you’re planning on extinguishing the fire, close both vents and the fire will quickly run out of oxygen to burn, and thus die out.
How and when to clean your grill
Cleaning your grill is mandatory, and it’s going to prolong the life of your grill. A clean grill is going to mean a long-lived one, so do your best to keep it clean.
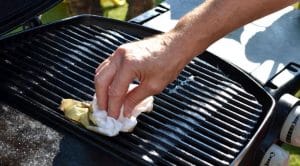
Most grills only need a quick brushing with a grill brush to become clean. Unless you’ve been grilling and not cleaning the grill for a whole season, a brush will do the job very well. A sturdy metal brush can be found on my Best Grill Brush page, and it’s soft enough to not damage cast iron grates.
As for exactly when to clean the grill, you can do this two ways. Both require the grill to be hot, but not burning hot. Just hot enough to get the grease running and create some steam if you sprinkle some water on the grill.
You could clean the grill right after you’re done grilling. Allow it to cool down, of course, but not completely cooled. The best part about this is that if you’ve got some really bad, sticky mess it will accumulate much less dust, lint, or other airborne annoyances than if you let it sit until the next grilling session.
I’m talking brown sugar sauces, and most BBQ sauces, which are a problem when grilling ribs.
Your other option is to clean the grill as it heats up for the next session. This means you’re going to clean it before cooking, and it’s going to conveniently use up the time you’d spend waiting for the grill to heat up anyway.
The downside is that grease and sticky bits become really stuck, and need more brushing, and you might not finish the job in time, before the grill get too hot to comfortably clean it.
I’ve written a comprehensive guide on how to clean your grill right here.
Smoking the meat &
veggies for the flavor
If you’ve got any other kind of grill except a wood or pellet one, chances are you’re missing out on the smoky flavor of grilled burgers, and buns warmed on such a grill.
As a beginner in your journey of becoming grill master, you’ll see you have two options: using cedar planks, or using smoker boxes to emulate the smoke flavor.
Grilling with cedar planks -yes or no ?
Using a cedar plank to grill and smoke your food is a great way to add flavor to your grilling. You can definitely use the cedar planks, but you should keep in mind a few tips on how to use them effectively.
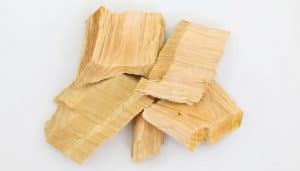
If you’ve never heard of using cedar planks, they’re 1/2 inch thick, wide and long planks made of pure cedar. They’re used to grill/smoke food, mostly meats, and give them a strong flavor.
Remember to soak the cedar planks for an hour (at least) before using. This will make sure the wood won’t burn up before you’re done cooking on it.
Another tip is to remember to let the plank char a bit on the underside before flipping it, and only then adding the food. This will enhance the smoky, charred flavor.
Closing the lid on the food will also make sure that you’re not going to get unevenly cooked food, since it’s going to get cooked by the plank and the hot air from above.
Should you use a smoker box ?
Depending on what you’re trying to accomplish, and how much of a grill-flavor fan you are, you might want to use a smoker box.
This is going to give your food a smoky flavor that’s basically non-existent on a gas grill, and this can be a deal breaker for some.
Or, if you’re using a charcoal grill and want a woody smoke rather than charcoal smoke, you’re again going to need a smoker box to get you that perfect smoky flavor.
A great smoker box can be found on my Best Smoker Box page, and it’s a thick aluminium box, with several holes in it for aeration.
A set of wood chips to sue for smoking can also be found on my Best Smoking Chips page, with several flavors.
Make sure to soak the wood chips at least half an hour before use, so they’ll be able to smoke your meat, and won’t burn out.
Conclusion
Grilling for the first time can be a daunting task, but you’re going to get the hang of it pretty easily. As long as you keep a level head, and remember that any mistake is a lesson, you’re bound to become a grill master in no time.
After all, no one was born with the knowledge, so we all have to start somewhere. Let this beginner’s guide help you take your first steps into the tasty world of grilling.